

Coral Acclimation Guide for Hobbyists: 2026 Edition
Table of Contents
- Preparation and Equipment for Coral Acclimation
- Step-by-Step Drip Acclimation Process
- Coral Dipping Procedure: Parasite Prevention
- Coral Light Acclimation Schedule for New Frags
- Why Is My Coral Losing Color? Troubleshooting Stress
- Species-Specific Acclimation Protocols and Water Chemistry Matching
- Common Mistakes to Avoid During Coral Acclimation
- Frequently Asked Questions
Last Updated: September 16, 2026
Preparation and Equipment for Coral Acclimation
Coral acclimation is the controlled process of moving a new coral from shipping water into your display tank's conditions without triggering osmotic shock, temperature stress, or parasite introduction. Get it right and the coral settles in within days. Get it wrong and you're watching tissue recession by the weekend.
Gather:
- A dedicated acclimation tub or bucket, never one used for cleaning
- The IceCap Acclimation Kit ($10.50), which includes a hygienic squeeze primer and foam strainer
- A refractometer for salinity matching
- Aquarium-safe tweezers for handling frags without crushing tissue
- A coral dip and a separate dip container
Step-by-Step Drip Acclimation Process
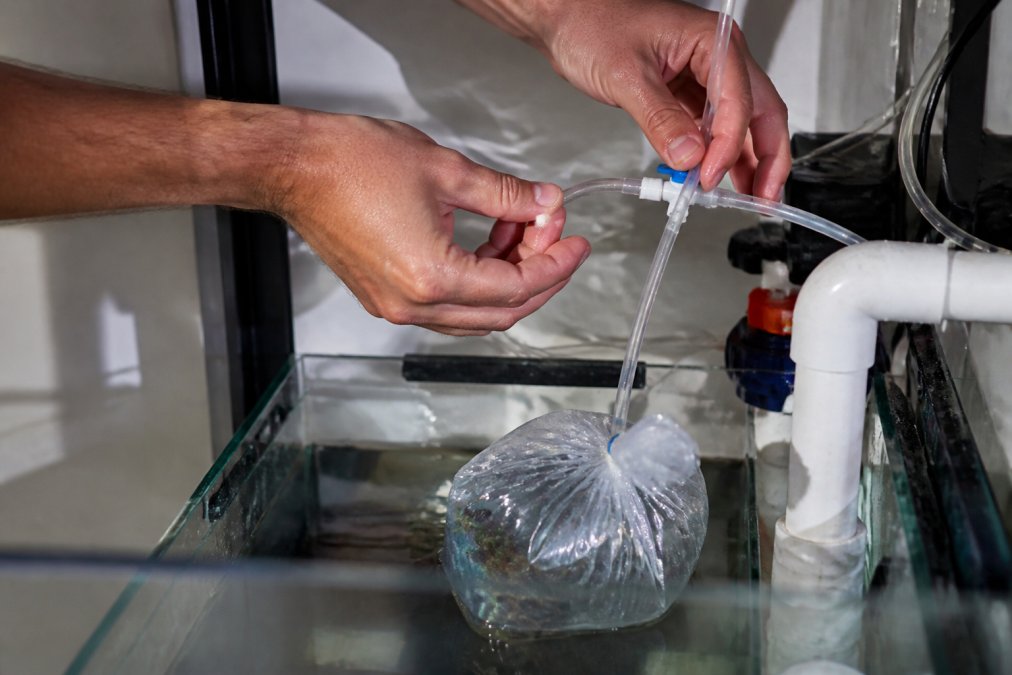
Drip acclimation gradually replaces shipping water with your aquarium water over 30 to 60 minutes using a gravity-fed line. It's standard for coral frags because salinity, pH, and alkalinity shift slowly enough for the coral's regulatory systems to keep pace.

Temperature Equalization First
Float the sealed bag in your sump or tank for 15 to 20 minutes before opening anything. This equalizes temperature without exposing the coral to air or your tank water, and comes first because a sudden thermal shift compounds every stressor that follows.
Setting Up the Drip Line
- Pour the coral and its shipping water into your acclimation tub.
- Anchor the intake tube over your display rim so the foam strainer stays submerged.
- Start the siphon with the primer bulb and open the thumb valve slightly.
- Adjust the drip to roughly two to four drops per second.
- Discard half the water once the volume doubles, then continue.
- After 30 to 60 minutes, move the coral to your dip container.
Coral Dipping Procedure: Parasite Prevention
A coral dip is a short, concentrated immersion that kills or detaches pests before they reach your display tank.
The coral dipping procedure is straightforward:
- Mix the dip at the manufacturer's stated concentration in a separate container.
- Place the frag in the solution for the recommended time, typically 5 to 15 minutes.
- Agitate gently with aquarium tweezers to dislodge flatworms and nudibranchs.
- Rinse the frag in clean tank water before placing it.
- Discard the dip solution, never pour it into your system.
| Dip Stage | Time | What to Watch For |
|---|---|---|
| Concentration mix | 2-3 min | Full dissolution, correct ratio |
| Immersion | 5-15 min | Pest shedding, coral stress signs |
| Agitation | Throughout | Dislodged flatworms, debris |
| Rinse | 1-2 min | Residual dip removal |
Coral Light Acclimation Schedule for New Frags
New frags need a reduced light period, not full intensity on day one. A coral light acclimation schedule gradually raises PAR levels and photoperiod over two to four weeks so the coral's zooxanthellae adjust without bleaching. But the correct ramp depends on skeletal structure and reef origin, treating an Acropora frag and a mushroom coral identically is why hobbyists lose one and not the other.

Why Light Acclimation Differs by Coral Type
Zooxanthellae are symbiotic algae living inside coral tissue. When a coral ships, it sits in darkness for 24 to 72 hours and its zooxanthellae population drops. Drop a light-starved coral under full reef intensity on day one and the sudden photon flux overwhelms the remaining algae, triggering bleaching. The recovery window, and therefore the ramp, depends on tissue density and skeletal shielding.
- SPS corals (Acropora, Montipora, Stylophora): thin tissue, high zooxanthellae density, minimal shielding. These bleach fastest and need the slowest ramp. Start at 30 to 40 percent of target intensity and extend the schedule to four weeks.
- LPS corals (Euphyllia, Favia, Caulastrea): thicker tissue and larger polyps give more internal shading. A three-week ramp starting at 50 percent of target intensity is usually safe.
- Soft corals (Zoanthus, Sarcophyton, Ricordea): the most forgiving. Many tolerate a two-week ramp starting at 60 percent of target intensity, though wild-collected specimens still benefit from the full four weeks.
- Wild-harvested specimens: regardless of type, double the ramp length. These corals have never been under artificial lighting and their zooxanthellae clades may be adapted to different spectral profiles than your fixture produces.
A Species-Adjusted Ramp
Use this as a starting framework, then adjust based on polyp extension and color:
- Week 1: Place the frag low in the tank (sandbed or lower rockwork). Reduce photoperiod by 40 percent for SPS, 30 percent for LPS, 20 percent for soft corals. Run the fixture at 30 to 50 percent of target intensity depending on type.
- Week 2: Raise SPS frags one-third of the way toward final placement. Restore half the lost photoperiod. Increase intensity by 10 percent.
- Week 3: Move LPS and soft corals toward final placement. SPS reach two-thirds of the way up. Restore full photoperiod. Increase intensity another 10 percent.
- Week 4: Final position for all types. Full photoperiod. SPS reach target intensity; LPS and soft corals may already be there.
Reading the Coral's Response
Why Is My Coral Losing Color? Troubleshooting Stress
Coral color loss almost always signals one of four problems: too much light too fast, unstable alkalinity, temperature swings, or a pest infestation. The fix depends on which one you're dealing with, and guessing wrong makes it worse.
Work through this in order:
- Bleaching (white, translucent tissue): reduce lighting intensity immediately, check temperature stability
- Brown, dull coloration: often insufficient light or elevated nutrients
- Patchy tissue recession: check alkalinity and calcium levels, look for pests
- Color loss with closed polyps: test salinity and specific gravity against your baseline
Species-Specific Acclimation Protocols and Water Chemistry Matching
Different coral types tolerate the transition differently, and treating every frag identically is why so many hobbyists lose SPS while their LPS thrive. Water chemistry matching is the variable most guides gloss over.
| Parameter | Target Range | Why It Matters |
|---|---|---|
| Salinity | 1.024-1.026 specific gravity | Prevents osmotic shock |
| Alkalinity | 7-9 dKH | Affects skeletal growth and stress response |
| Calcium | 400-450 ppm | Structural stability for SPS |
| Temperature | 76-79°F | Metabolic rate and immune function |
Species-specific notes worth knowing:
- SPS corals: extend drip time, match alkalinity closely, start low in the tank
- LPS corals: more forgiving of salinity swings but sensitive to flow changes
- Soft corals: tolerate wider ranges but still benefit from full drip acclimation
- Wild-harvested specimens: double the acclimation duration and expect a longer settling period
Common Mistakes to Avoid During Coral Acclimation
The mistakes that kill corals are almost always about speed: rushing the drip, skipping the dip, or placing a frag at full light on day one accounts for most losses we hear about. The deeper problem is that hobbyists don't know what a stressed coral looks like in the first 48 hours, so they either panic and intervene when they shouldn't, or ignore a real problem until tissue is already receding.
Normal Stress vs. Dangerous Stress: A 48-Hour Checklist
Shipping stress is expected, the coral has been bagged, temperature-cycled, and shaken for a day or more. What matters is whether it's recovering or deteriorating. Check these signs at the 2-hour, 12-hour, 24-hour, and 48-hour marks after placement.
Normal shipping stress (leave the coral alone):
- Polyps retracted but tissue firm and colored
- Mucus production in the first few hours
- Slight paling that stabilizes by 24 hours
- Polyps extending partially during the first photoperiod
- A small amount of stringy material from the frag plug (usually dead shipping debris, not coral tissue)
Dangerous stress (act immediately):
- Tissue peeling away from the skeleton in sheets, this is rapid tissue necrosis (RTN) and can kill an SPS frag in under 12 hours
- White, exposed skeleton visible at the base or along the frag plug
- Foul smell when you open the acclimation container (bacterial infection)
- Polyps extending but tissue turning translucent and glassy
- Brown jelly-like substance coating LPS tissue, this is brown jelly disease and spreads to neighboring corals
- Color continuing to fade past the 48-hour mark instead of stabilizing
What to Do When You See Dangerous Signs
RTN and brown jelly disease both move fast enough that waiting a day to "see if it recovers" usually means losing the frag. For RTN, frag off the healthy tissue above the recession line with a clean bone cutter, dip the frag in an iodine-based coral dip, and mount it on a fresh plug. For brown jelly, siphon the affected tissue off with a turkey baster, dip the coral, and isolate it from other LPS.
The Mistakes That Actually Cause These Problems
- Dripping for 10 minutes and calling it done, salinity shock sets up RTN two days later
- Pouring shipping water into your display tank, introduces ammonia and pathogens
- Skipping the dip because the coral "looks clean", pests are often invisible until they've multiplied
- Placing the frag at its final position immediately, combines light, flow, and chemistry stress in one event
- Adjusting multiple parameters at once when something goes wrong, you lose the ability to identify the cause
- Reusing acclimation water for the next shipment, cross-contamination between specimens
- Handling the coral with bare hands, oils and temperature transfer damage tissue
For a broader reference on livestock handling and coral disease, the NOAA coral reef conservation resources and the American Reef Coalition husbandry guidance both cover the biological reasoning behind slow transitions and disease identification.
Frequently Asked Questions
How long should you acclimate corals?
Most corals need 30 to 60 minutes of drip acclimation. Start with temperature equalization by floating the bag for 15 minutes. Then begin the drip at 2 to 4 drops per second. For sensitive SPS or wild-harvested specimens, extend to 90 minutes. The goal is to double the original shipping water volume before adding the coral to your reef tank.
Is drip acclimation necessary for coral?
Drip acclimation is strongly recommended for most corals, especially if salinity or pH differs between shipping water and your aquarium water. A slow drip prevents osmotic shock and reduces biological stress. For hardy soft corals from a local store with matching parameters, floating the bag for temperature equalization may be enough, but drip acclimation remains the safer choice.
What is the best method for dipping new coral frags?
Use a dedicated coral dip following the product instructions. Remove the frag from shipping water, place it in a dip container with tank water, and add the dip solution. Soak for the recommended time, usually 5 to 15 minutes. Then rinse the frag in clean tank water before placing it in your quarantine tank or display. This process helps prevent parasites and tissue recession.
How do you acclimate corals to new lighting intensity?
Start new corals low in the tank, on the sandbed or in a shaded area, then move them up gradually over 2 to 4 weeks. Reduce your light intensity by 30 to 50 percent for the first week, or use a screen to diffuse light. Increase PAR levels by 10 to 15 percent weekly. Watch for bleaching or polyp extension changes and adjust the coral light acclimation schedule accordingly.
Professional Reef Tank Installation Cost: 2026 Guide
Design a 75 Gallon Reef Tank: Complete Setup Guide
Related Posts

How to Choose the Right Coral Lighting

SPS vs LPS Coral Care Requirements

Design a 75 Gallon Reef Tank: Complete Setup Guide

Professional Reef Tank Installation Cost: 2026 Guide

How to Prevent Fish Disease Introduction: 7 Steps

Troubleshooting Common Reef Tank Problems: 2026 Guide
