

Coral Fragging for Beginners: Step-by-Step Guide
Table of Contents
- What Is Coral Fragging?
- Essential Tools and Equipment for Coral Fragging
- Selecting the Right Mother Colony
- Step-by-Step Coral Fragging Process
- How to Mount Coral Frags Securely
- Coral Healing Time After Fragging
- Common Mistakes to Avoid
- Pest Management and Troubleshooting Failed Frags
- Frequently Asked Questions
Last Updated: October 1, 2026
What Is Coral Fragging?
Coral fragging is the process of cutting a healthy coral colony into smaller pieces and growing them as independent corals. Think of it like plant propagation, but for reef aquariums. You take a mother colony, make careful cuts, mount the fragments on plugs, and let them heal and grow in your tank.
Fragging lets you expand your collection without buying new livestock and helps preserve wild reefs. At Blue Earth Corals and Aquariums, we've worked with hobbyists for 19+ years using this technique to build thriving reef ecosystems.
With the right tools, a steady hand, and proper aftercare, coral fragging beginners can succeed. The key is knowing which corals tolerate cutting and how to keep frags alive during healing.
Essential Tools and Equipment for Coral Fragging
Specific tools are essential for safe, effective fragging. Dull or contaminated tools risk tissue damage and infection.
Cutting Tools
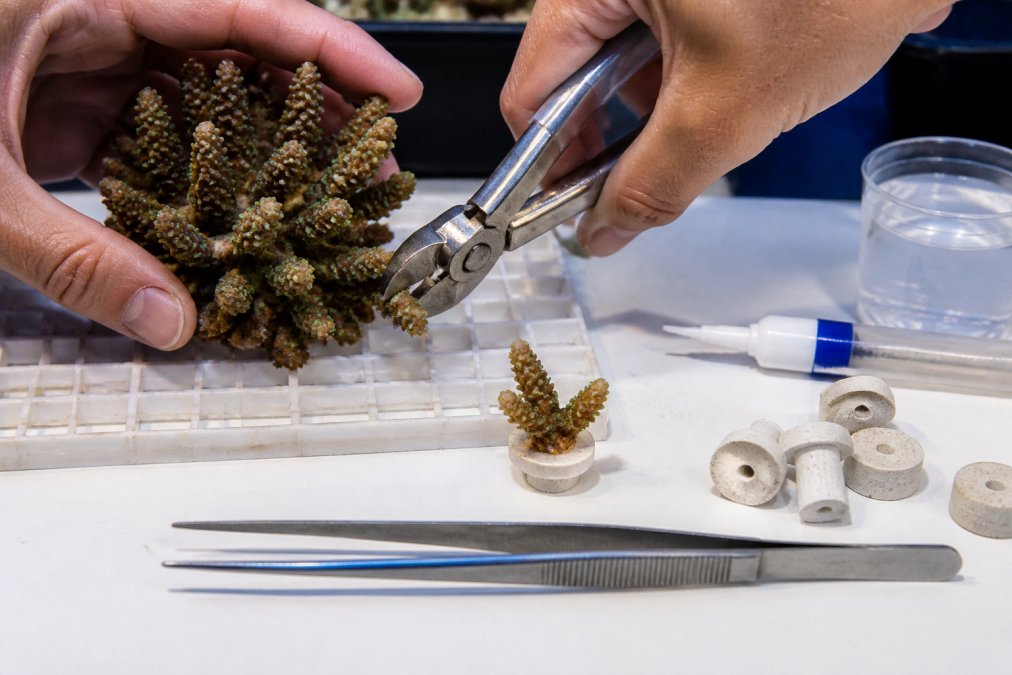
Bone cutters are the standard choice, delivering clean cuts through skeleton without crushing tissue. Use stainless steel models and keep blades sharp, dull cutters mangle tissue and slow healing. Scalpels work for precision cuts on delicate corals but require a steady hand. Many reefers use both depending on species.
Sterilization matters. Before each fragging session, soak your cutting tools in a 10% bleach solution for 5 minutes, then rinse thoroughly with fresh water and dip in dechlorinated water. This prevents spreading pests or bacteria between corals.
Mounting Materials
Frag plugs are ceramic or aragonite bases that give frags a stable platform to attach and calcify. The IceCap 3/4in Biological Frag Plugs with Mounting Divot (25pc) at $9.70 feature a porous matrix that accelerates encrusting. The IceCap 1in Biological Frag Plugs with Mounting Divot (25pc) at $11.13 provides extra surface area for larger frags.


Cyanoacrylate gel (aquarium-safe super glue) bonds fragments to plugs. Gel formulas don't run off like liquids. Apply sparingly, excess glue creates dead zones where bacteria can't colonize.
Epoxy putty secures plugs to rockwork or frag racks. It hardens in saltwater and holds frags in place during the critical healing period. Some reefers prefer epoxy putty over glue for initial mounting because it allows repositioning before it fully sets.
Selecting the Right Mother Colony
Choose healthy colonies with strong polyp extension and vibrant color, stressed corals frag poorly. Select colonies at least 4-6 inches across; smaller ones lack biomass to survive cutting. Inspect under strong light for disease, algae, or pests. Test water parameters before fragging: calcium, alkalinity, and magnesium must be stable. Correct any imbalances 1-2 weeks before fragging.
Step-by-Step Coral Fragging Process
Step 1: Prepare Your Work Area and Sterilize Tools
Set up a clean workspace with all tools, plugs, glue, and dip solutions within reach. Sterilize cutting tools by soaking in 10% bleach for 5 minutes, then rinse with fresh water and dip in dechlorinated water.
Step 2: Cut the Coral Fragment
Position the colony for a clear view and make a single, decisive cut through skeleton, sawing motions damage tissue. Cut at least 1 inch from the main colony to leave healthy tissue on both pieces. For branching corals, cut branches at the base; for encrusting corals, cut 1-2 square inches of tissue. Work quickly; complete cuts within 2-3 minutes.
Step 3: Apply Adhesive and Mount the Frag
Place a small amount of cyanoacrylate gel in the plug divot, excess creates dead zones. Press the cut end firmly into the gel for 10-15 seconds without moving. Once set, place the frag in a safe location.
How to Mount Coral Frags Securely
Stable mounting prevents tissue necrosis and slow growth. Use the IceCap Frag Magnetic Tray Mount at $31.75 for secure, organized mounting. Position frags where they receive appropriate lighting and flow for their species. Avoid stagnant water; gentle, consistent flow is ideal.

Coral Healing Time After Fragging
Most frags show visible progress within 2-4 weeks, but for coral fragging beginners, environment during healing is equally critical to timeline. Beginners often assume standard tank conditions work for frags, then wonder why they fail.
IceCap 3/4in Biological Frag Plugs with →
Healing Timelines by Coral Type
Soft corals heal fastest. Leather and mushroom frags often show polyp extension within 3-5 days. They encrust onto plugs in 2-3 weeks and grow noticeably within a month.
LPS corals (large-polyp stony) take 2-4 weeks to show polyp extension. Healing is slower than soft corals, but these species tolerate cutting stress reasonably well.
Recovery Environment: The Hidden Variable
Water chemistry is only half the equation. Frags are metabolically stressed and need specific lighting and flow conditions to recover efficiently.
Monitoring Healing Progress
Let frags sit undisturbed; frequent repositioning breaks tissue. Monitor daily for healthy progress (gradual polyp extension, stable color, no recession) or warning signs (brown/white tissue, recession, retracted polyps after 2 weeks, slimy film). If warning signs appear, check parameters immediately, calcium and alkalinity deficiency is the most common culprit. If parameters are stable, isolate the frag in lower flow and observe for 3-5 days.
Common Mistakes to Avoid
Fragging stressed corals: Weakened corals rarely survive. Start with healthy, vigorous colonies. Using dull tools: Dull cutters crush tissue and attract infection. Sharpen regularly. High-flow mounting: Excessive flow tears tissue. Position in moderate flow. Skipping sterilization: Contaminated tools spread pests. Sterilize before every session. Overgluing: Excess glue creates dead zones. Use a small amount in the divot. Changing parameters: Fluctuating calcium, alkalinity, and magnesium slow healing.
Pest Management and Troubleshooting Failed Frags
Frag failure falls into two categories: pest-driven loss and tissue necrosis (RTN or STN). Understanding the difference is critical because recovery steps differ.
Pest Prevention During Fragging
Pests like parasitic flatworms, copepods, and nudibranchs decimate frags during healing. Unlike established corals, healing frags have compromised tissue barriers and cannot fight infection.
Diagnosing Tissue Necrosis: RTN vs. STN
Tissue recession after fragging falls into two patterns, each with different causes and recovery strategies.
Symptom-Based Troubleshooting
Frag turns brown or pale within 1 week: Move to 30-40% light and increase feeding 2-3 times daily. Test parameters; dose if calcium or alkalinity is low. Tissue recession at cut site only: Remove excess glue with a file and increase water flow slightly. Monitor daily; if recession stops within 3-5 days, the frag is recovering. No polyp extension after 4 weeks: Test parameters first.
Building a Fragging Log
Keep a simple spreadsheet or notebook of your fragging attempts:
- Date and coral species
- Mother colony health assessment (color, polyp extension, size)
- Water parameters at time of fragging (calcium, alkalinity, pH, temperature)
- Tools used and sterilization method
- Mounting position and lighting/flow zone
- Outcome at 2 weeks, 4 weeks, 8 weeks
- Any pest treatments or interventions
Over time, you'll identify patterns in what works in your tank and what doesn't. You may discover that SPS frags in your tank prefer slightly lower light than the literature suggests, or that your alkalinity drops faster than expected during healing. This data is invaluable for improving your success rate.
Frequently Asked Questions
What tools are essential for coral fragging?
The core tools for coral fragging include bone cutters for clean cuts, a scalpel for precision work, cyanoacrylate gel adhesive, frag plugs, and tweezers. Quality matters, dull tools crush tissue instead of cutting cleanly, leading to tissue necrosis and failed frags. IceCap tweezers maintain neutral buoyancy in saltwater, preventing accidental damage to your tank. Frag plugs with mounting divots, like IceCap's biological ceramic nano-sphere plugs, provide a three-dimensional structure that accelerates encrusting and supports beneficial bacteria growth.
How long does it take for a coral frag to heal after fragging?
Most coral frags require 2-4 weeks to fully heal and begin new growth, though this varies by species. SPS corals typically calcify within the first week, while LPS and soft corals may take longer to form a stable slime coat. During the healing period, maintain stable water chemistry with proper alkalinity and calcium levels. Avoid high flow directly on the cut site for the first few days. You'll know healing is progressing when you see polyp extension and the frag begins encrusting onto the mounting surface.
How do you know if a coral is ready to be fragged?
A healthy mother colony should be at least 3-4 times the size of the frag you plan to cut. The colony should show active polyp extension, vibrant coloration, and stable growth for at least 6-12 months before fragging. Avoid fragging stressed corals showing tissue recession or bleaching. For branching corals like Acropora, branches should be thick and well-calcified. Soft corals should have dense, healthy polyp extension. Never frag a colony that's recently acclimated, give it time to establish in your tank first.
What is the best way to mount coral frags?
Use cyanoacrylate gel adhesive on a quality frag plug with a mounting divot to secure the frag upright. The divot prevents glue runoff and anchors the base mechanically. IceCap biological frag plugs provide a porous three-dimensional matrix that mimics natural reef structure, allowing water flow to sweep through and supporting beneficial bacteria colonies. After gluing, let the adhesive cure for 30-60 seconds before placing the frag in your tank. Position new frags in moderate flow and lighting initially, then gradually increase both as the frag heals and begins encrusting.
Related Posts

How to Improve Coral Health: A Reef Tank Guide

Why Corals Die After Introduction: Prevention Guide

Living Art Aquariums vs Corals.com: Which Fits Your Reef?

Reef Tank Design for Small Spaces: A How-To Guide

Stable Reef Water Parameters: A 2026 How-To Guide

Avoiding Coral Shipping Damage: 7 Proven Tips
