

Avoiding Coral Shipping Damage: 7 Proven Tips
Table of Contents
- Why Coral Shipping Damage Happens (And What It Costs You)
- Best Packing Materials for Live Coral
- Coral Shipping Temperature Requirements You Can't Ignore
- Carrier Rules for Shipping Live Coral
- How to Acclimate Shipped Coral Without Adding Stress
- Post-Shipping Recovery: What to Expect in the First 72 Hours
- Common Mistakes That Cause Coral Shipping Damage
- Conclusion
- Frequently Asked Questions
Last Updated: September 24, 2026
Why Coral Shipping Damage Happens (And What It Costs You)
Coral shipping damage is the physical and biological harm that live specimens suffer during transit, ranging from cracked skeletons to tissue loss and full colony death. It happens because corals are fragile live animals exposed to vibration, temperature swings, and water chemistry changes in a sealed box.
At Blue Earth Corals and Aquariums, we've packed livestock for years, and the pattern never changes: most losses trace back to three preventable problems. Rough handling bruises tissue. Poor insulation lets heat spike or crash. And stressed specimens arrive with weakened immune systems, which makes infection more likely.
The cost isn't just the coral. You lose the money, the waiting, and the tank position you cleared for it. Below are seven proven tips to keep your next shipment alive and healthy.
Best Packing Materials for Live Coral
The best packing materials for live coral are poly bags for individual frags, rigid foam insulation for temperature control, and a double-boxed outer shell for impact protection. Each layer solves a different problem, and the material you choose for the innermost layer depends on the coral's skeleton and how much it will move in transit.
Here is what actually works, and why:
- Poly bags: Flexible, watertight, and they cushion against minor bumps. Best for smaller frags and soft corals that conform to the bag.
- Rigid containers: Better for stony corals with sharp skeletons that can puncture a bag. A hard wall cannot be cut from the inside.
- Bubble wrap: Wraps the bag or container so plugs do not knock together. Use enough layers that the frag cannot shift when you shake the box gently.
- Foam insulation: Lines the box walls and slows temperature change. Thicker foam means a slower temperature curve, which matters more than the starting temperature.
- Double boxing: An inner box inside an outer box absorbs impact from drops. The inner box should not touch the outer box walls on all sides.
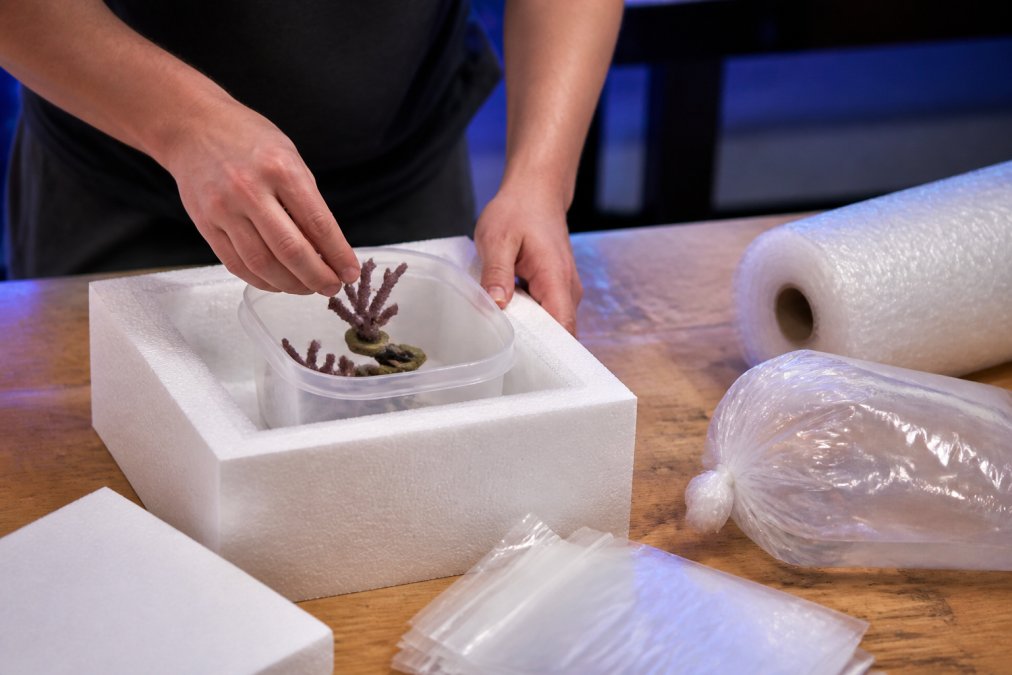
A common mistake is sealing a coral in a bag with too little water. The water sloshes, the coral rubs against the plastic, and tissue tears. Leave enough water that the specimen floats rather than scrapes. As a working rule, the water volume should be large enough that the frag moves with the water, not against the bag.
Poly Bags vs. Hard Containers: Which Protects Better?
This is the comparison most guides skip, and it is the one that decides whether your shipment survives a drop.
Poly bags win on flexibility and cost. They conform to the specimen, cushion minor impacts, and seal watertight with a proper double-bag and rubber-band closure. Their weakness is puncture resistance. A stony coral with a sharp skeleton, or a frag plug with an exposed stem, can cut through the plastic from the inside during vibration. Once the bag leaks, the shipment is lost.
Hard containers win on puncture resistance and structural protection. A rigid jar or transport container cannot be cut from the inside, and it holds its shape under stacking pressure. Their weakness is that they do not cushion. A hard container transmits impact directly to the specimen unless it is padded inside and out, and a rigid lid can pop if the container is overfilled and the water expands.
For a mixed order, use both. Bag the soft corals and small frags. Put the stony corals and anything with a brittle skeleton in a rigid container. Then pad both types so nothing touches anything else.
A second trade-off is handling. Every time you move a frag from bag to container to dip station, you add stress. A purpose-built carrier reduces that handling. The IceCap Frag Transport Container (Holds 8) holds up to eight frags in a watertight 500ml jar with a rubber membrane that grips each plug stem. It also doubles as a dipping vessel when you get home, which cuts down on handling stress.

For local transport between swaps or stores, a purpose-built carrier beats a bag every time. The same logic applies to shipping: the fewer times a specimen is transferred, the fewer chances it has to be damaged.
Coral Shipping Temperature Requirements You Can't Ignore
Coral shipping temperature requirements usually call for keeping specimens in a stable range near their tank temperature, with insulation and heat or cold packs matched to the season. The exact number depends on the species and the weather along the route.
IceCap Frag Transport Container (Holds →
What matters more than any single number is stability.
- Summer: Use cold packs, and never let them touch the coral directly.
- Winter: Use heat packs, and add extra foam so the warmth spreads evenly.
- Spring and fall: Insulation alone often does the job.
Carrier Rules for Shipping Live Coral
Before you book anything, confirm four things in writing:
- Whether live aquatic animals are allowed on that specific service level, not just the carrier generally
- What labeling, marking, and declaration the shipment requires
- What the live-arrival policy actually covers, and what it excludes
- What the claim window is, and what evidence the carrier requires to file one
Read the current version of each policy before every shipment, because these rules change without much notice. Save a screenshot or PDF of the policy on the day you ship. If a claim is ever disputed, that dated copy is your evidence of what the rules were when you booked.
How to Acclimate Shipped Coral Without Adding Stress
How to acclimate shipped coral comes down to slow temperature matching, then careful water mixing, then a pest dip. Rushing any of these steps adds stress to a specimen that's already worn out from transit.
Here's the sequence we recommend:
- Float the bag. Let it sit in your tank for 15 to 20 minutes to match temperature.
- Open and test. Check the bag water's salinity and alkalinity against your tank.
- Drip or mix. Add small amounts of tank water to the bag over 30 to 45 minutes.
- Dip. Use an iodine dip or coral dip to knock back pests and bacteria.
- Place low. Start the coral in low light and low flow, then move it up over days.
Post-Shipping Recovery: What to Expect in the First 72 Hours
Expect shipped coral to look unhappy for the first day or two. That's normal. Recovery in the first 72 hours usually follows a predictable pattern.
- First 6 hours: Retracted polyps, dull color, and sliminess. Leave it alone.
- 12 to 24 hours: Polyps begin to peek out. Color starts to return.
- 48 hours: Most specimens show feeding response. Light feeding is fine.
- 72 hours: Tissue should look firm. Any white patches or melting mean trouble.
Common Mistakes That Cause Coral Shipping Damage
Most coral shipping damage comes from a short list of avoidable errors. Fix these and your success rate climbs fast.
- Too little water in the bag. The coral scrapes against plastic and tears.
- Loose plugs. Frags knock together and snap skeletons.
- No insulation. Temperature swings do the damage.
- Heat or cold packs touching the bag. Localized shock kills tissue.
- Skipping the dip. Pests and bacteria take hold in a weakened specimen.
- Acclimating too fast. Salinity and temperature shock compound.
- Moving the coral too soon. Repositioning restarts the stress cycle.
Conclusion
Every coral you order has already survived a rough trip before it reaches your tank. The margin between a thriving colony and a dead one comes down to a handful of decisions: how it's packed, how it's kept warm, how it's acclimated, and how much patience you give it afterward.
Frequently Asked Questions
How long can corals survive in shipping?
Most corals can survive 24 to 48 hours in transit if packed correctly with proper temperature control and oxygen. Beyond 48 hours, stress compounds quickly. Water quality drops, oxygen depletes, and temperature swings become harder to manage. Choose overnight or express shipping whenever possible. If a delay happens, open the container immediately upon arrival and begin acclimation right away to give the coral its best chance.
What temperature range is safest for shipping live corals?
Coral shipping temperature requirements generally call for keeping the package between 72 and 78 degrees Fahrenheit. Below 68 degrees, tissue damage and bleaching become likely. Above 82 degrees, oxygen drops and harmful bacteria multiply fast. Use insulated boxes with heat packs in cold months and cold packs in warm months. Never let the coral sit on a hot truck bed or a freezing porch.
What are the most common causes of coral shipping damage?
Physical impact tops the list. Loose frags sliding around in bags bruise tissue and snap skeletons. Temperature swings come second. Poor water quality in the bag, usually from too little water volume or a long transit time, causes ammonia buildup. Rough handling during carrier transfers adds stress. Double boxing, secure frag placement, and proper insulation prevent most of these problems before they start.
How do you properly acclimate coral after shipping?
Float the sealed bag in your tank for 15 to 20 minutes to match temperature. Then drip tank water into the bag slowly over 45 to 60 minutes. This lets the coral adjust to your water chemistry without shock. After drip acclimation, dip the coral using an iodine dip or coral dip following the product instructions. Place it in a low-flow area of the reef tank for the first few days before moving it to its permanent spot.
How to Design Reef Ecosystems: A 2026 Guide
Stable Reef Water Parameters: A 2026 How-To Guide
Related Posts

Coral Fragging for Beginners: Step-by-Step Guide

How to Improve Coral Health: A Reef Tank Guide

Why Corals Die After Introduction: Prevention Guide

Living Art Aquariums vs Corals.com: Which Fits Your Reef?

Reef Tank Design for Small Spaces: A How-To Guide

Stable Reef Water Parameters: A 2026 How-To Guide
