

Buying Healthy Live Coral Online: A 2026 Buyer's Guide
Table of Contents
- Why Buying Healthy Live Coral Online Starts With the Seller
- Aquacultured vs Wild Caught Coral: Which Is Safer to Buy?
- What a Healthy Coral Looks Like Before You Click Buy
- Live Arrival Guarantees and Shipping Policies Explained
- How to Acclimate New Coral Step by Step
- Quarantine Procedures for New Corals: Do You Need Them?
- Why Is My Coral Losing Color After Arrival?
- Your First 48 Hours: Post-Arrival Recovery Protocol
- Frequently Asked Questions
Last Updated: September 7, 2026
Buying healthy live coral online is a gamble that too many reef hobbyists lose. A stunning photo can arrive as a bleached, stressed frag that never recovers. The health of your new coral is largely determined before you ever click "add to cart." At Blue Earth Corals and Aquariums, we have spent over 19 years propagating and shipping corals from our aquaculture facility in West Palm Beach.
Aquaculture is the practice of raising corals in controlled environments rather than harvesting them from natural reefs. Most corals for sale online fall into two categories: aquacultured or wild-harvested. This distinction matters more than almost any other factor when buying healthy live coral online, because it predicts how well the specimen will adapt to your tank.
Why Buying Healthy Live Coral Online Starts With the Seller
The single most important step in buying healthy live coral online is evaluating the seller's reputation and facility before you look at a single coral photo.
A facility that grows its own stock can control water chemistry, lighting, and nutrition from the start. Resellers who source from multiple wild collectors often cannot tell you where a coral came from or how it was handled.
Look for sellers who provide detailed husbandry information, answer questions about PAR and alkalinity directly, and show real photos of the exact specimen. Vague descriptions and stock photos are red flags.

Aquacultured vs Wild Caught Coral: Which Is Safer to Buy?
Aquacultured corals are fragments grown in captivity, often for generations, while wild-harvested corals are collected directly from natural reefs. For most hobbyists, aquacultured coral is safer because it has already adapted to artificial lighting, stable water parameters, and regular feeding.
Tank-raised specimens handle shipping stress better and carry a lower risk of introducing pests and diseases. Wild-harvested colonies can bring in unwanted hitchhikers and often struggle to adjust to home aquarium conditions.
By choosing tank-raised frags, you reduce demand for wild collection and help protect natural reef ecosystems. When buying healthy live coral online, always check whether the listing specifies aquacultured or wild origin.
What a Healthy Coral Looks Like Before You Click Buy
A healthy coral frag is not just about color. It is about tissue integrity, polyp behavior, and the absence of stress signals that photos often reveal.
Reading the Tissue: The Most Important Cue
The most reliable indicator of health is the coral's flesh itself. Look for a continuous, unbroken layer of plump, firmly attached tissue covering the entire skeleton.
Here are the specific visual red flags to look for in listing photos:
- Tissue Recession: This is the most critical sign. Look at the coral's base. If you see a clean, white line of bare skeleton between the living tissue and the frag plug, the coral is actively dying. This condition, often called 'tissue necrosis,' rarely reverses during shipping. A coral with a fully encrusted base, where tissue has grown over the plug, is a sign of a long-established, healthy frag.
- Peeling or Sloughing Tissue: In photos, this can look like a translucent film lifting off the skeleton. This is a sign of severe stress or a bacterial infection and is a definitive reason to avoid the purchase.
- Bleaching: A coral that is stark white or has a translucent, 'see-through' appearance has expelled its zooxanthellae (noaa.gov). While some corals can recover, a fully bleached coral is in a critical state and will not survive the additional stress of shipping.
- Discolored Patches: Look for brown or dark spots that are not part of the coral's natural pattern. This can indicate tissue damage, a bacterial infection, or the presence of a pest. For example, a circular, pale ring on an otherwise healthy coral is a classic sign of a predatory flatworm.
Polyp Extension: A Tale of Two Lights
Polyp extension is a useful but nuanced indicator. A coral with polyps fully extended in a photo is generally a good sign, but under actinic blue light many corals extend polyps to capture the limited spectrum, which can mask stress.
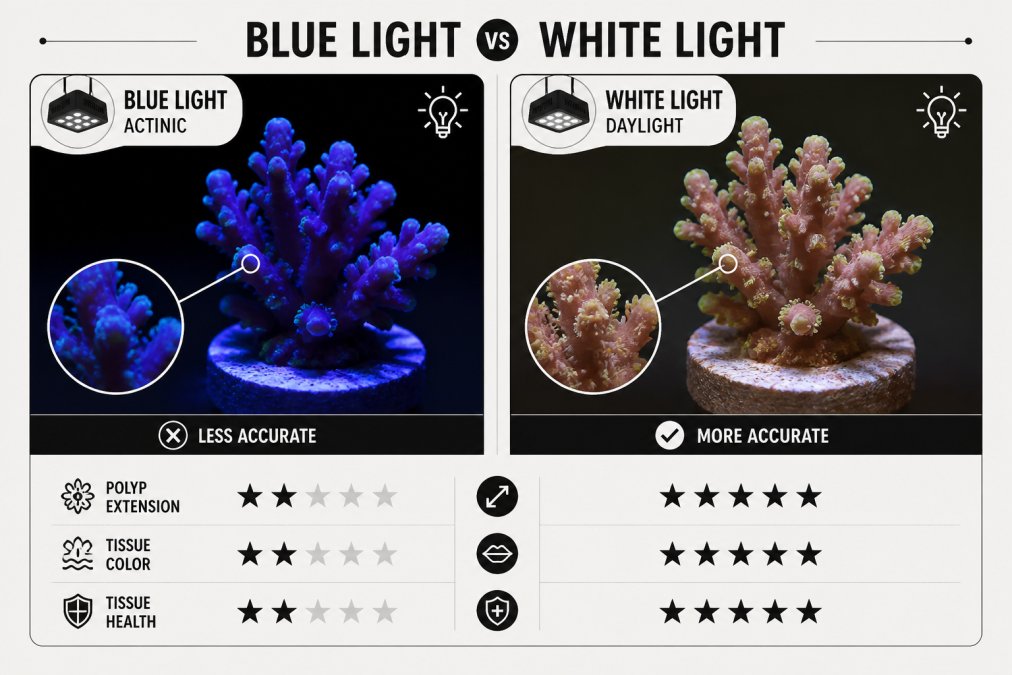
The best practice is to request a photo under white, or 'daylight,' lighting. This is the only way to accurately assess true color and tissue condition.
The WYSIWYG Advantage and How to Use It
WYSIWYG (What You See Is What You Get) listings are the gold standard because they show the exact specimen. However, you still need to apply the same scrutiny.

If the listing is not WYSIWYG, ask for a photo of the exact frag you will receive. A reputable seller will provide one. If they cannot or will not, treat that as a red flag.
A Quick Visual Checklist for Your Review
Before you click 'add to cart,' run through this mental checklist based on the photos:
- Base: Is the tissue fully encrusted on the plug, or is there a visible gap of white skeleton?
- Tissue: Is the flesh plump and continuous, or is it peeling, sloughing, or receding?
- Color: Is the color vibrant and consistent, or is it pale, translucent, or showing unusual dark spots?
- Lighting: Is the photo under white light, or only flattering blue light?
- Polyps: Are the polyps extended, and does the coral have a 'fuzzy' or 'hairy' appearance that indicates it is actively feeding?
Mastering this visual assessment is the most powerful skill you can develop for buying healthy live coral online.
Live Arrival Guarantees and Shipping Policies Explained
A live arrival guarantee is a seller's promise that your coral will arrive alive. These guarantees typically require you to photograph the dead coral in its unopened bag within a specific time window, usually one to two hours after delivery.
Sellers should use insulated shipping containers with heat packs in winter and cold packs in summer. Overnight shipping is standard. Understand the seller's policy on weather delays, since most guarantees do not cover packages held by the carrier.
The guarantee window matters. A seller who allows only one hour to report a problem is less accommodating than one who gives two hours. Read the policy carefully and make sure you will be home to receive the package.
How to Acclimate New Coral Step by Step
Proper acclimation is the process of slowly adjusting your new coral to the temperature and water chemistry of your display tank. Rushing this step is one of the fastest ways to kill an otherwise healthy specimen.
Float the sealed bag in your aquarium for 15 to 20 minutes to equalize temperature. Then test the salinity of the shipping water against your tank water. If it differs significantly, drip acclimate by adding small amounts of tank water over 45 to 60 minutes. This prevents osmotic shock.
Coral frags are generally more tolerant of parameter swings than fish, but they still benefit from a slow introduction. After acclimation, place the frag in a low-flow, low-light area for the first few days before moving it to its final placement.
| Step | What to Do | Duration |
|---|---|---|
| Temperature float | Float sealed bag in tank | 15-20 minutes |
| Salinity check | Test shipping water vs. tank water | 1-2 minutes |
| Drip acclimation | Add tank water gradually | 45-60 minutes |
| Placement | Set frag in low-flow, low-light area | 2-3 days |
Quarantine Procedures for New Corals: Do You Need Them?
Quarantine is the practice of keeping new corals separate from your display tank to observe them for pests and disease. While many hobbyists skip this step, it is the single best defense against introducing problems to an established reef system.
A dedicated quarantine tank does not need to be large or elaborate. A small tank with basic lighting, a heater, and a powerhead is sufficient. During a two to four week period, you can observe the coral for flatworms, nudibranchs, and other pests.
Dipping is a related practice where you treat the coral with a commercial dip solution to kill pests before it enters your tank. Many experienced reef keepers dip all new corals as a matter of routine. When buying healthy live coral online, ask the seller if they dip and quarantine their stock before shipping.
Why Is My Coral Losing Color After Arrival?
Coral color loss after arrival is almost always a response to stress, most commonly from a sudden change in lighting conditions. A coral grown under intense lighting may appear dull when moved to a tank with less intense light.
This process, known as photoadaptation, is natural. The coral is adjusting its internal zooxanthellae population to match new light levels. In most cases, color returns gradually over several weeks. Resist the urge to blast the coral with high light to "force" color back, as this will only increase stress.
Water chemistry also plays a role. Low alkalinity or calcium levels can slow recovery and affect coloration. Test your tank water and ensure parameters are stable. LPS corals generally tolerate broader conditions, while SPS corals demand pristine, stable water.
Your First 48 Hours: Post-Arrival Recovery Protocol
The first 48 hours are not about 'waiting to see if it lives.' They are about actively managing the coral's recovery from shipping stress. A coral that has been in a bag for 24 hours has experienced significant swings in temperature, pH, and dissolved oxygen. Your goal is to stabilize it and minimize further stress.
Hour 0: Arrival and Initial Assessment
The moment the package arrives, your clock starts. Do not leave it on the porch. Bring it inside immediately.
- Open the Box: Carefully open the shipping box and locate the coral bag. Do not open the bag itself yet.
- Photograph the Bag: Take a photo of the sealed bag. This is your proof of life for any guarantee claim.
- Visual Check: Look at the water. Is it clear or cloudy with mucus? A small amount of mucus is normal, but excessive cloudiness indicates severe stress.
- Temperature Float: Float the sealed bag in your sump or display tank for 15-20 minutes. Do not open the bag during this time.
Hour 1: The Dip and the Acclimation
After the temperature has equalized, it is time to address potential pests and begin water chemistry adjustment.
- The Coral Dip (Optional but Recommended): This is the single most effective step for preventing pest introduction. Use a commercial coral dip like CoralRx or Revive (reef2reef.com). In a separate container, mix the dip solution with water from the shipping bag (not your tank water). Gently swirl the coral for the recommended time, typically 5-10 minutes. After dipping, rinse the coral in clean saltwater.
- Drip Acclimation: Set up a drip line using airline tubing with a knot to create a slow drip (2-3 drops per second) from your display tank into the container. A 45-60 minute drip, which roughly doubles the water volume, is a safe standard. This prevents osmotic shock.
Hour 2: Placement in the 'Recovery Zone'
Your tank should have a designated 'recovery zone' ready before the coral arrives. This is a low-light, low-flow area, typically on the sand bed or in a shaded spot.
- Place the Frag: After the drip is complete, gently place the frag on the sand bed or a low rock. Do not glue it down yet.
- Do Not Feed: Your coral's energy is focused on cellular repair, not digestion. Do not offer any food for the first 24 hours.
- Leave It Alone: Resist the urge to 'check on it' constantly. Each time you disturb the water or the coral, you add stress.
Hours 24-48: Monitoring and the First Signs of Recovery
Over the next day, you are looking for specific signs that the coral is stabilizing.
- Polyp Extension: The most positive sign is the gradual return of polyp extension, often most visible in the evening. A coral extending its polyps is actively trying to feed.
- Mucus Production: A thin, clear mucus film is normal. Thick, stringy, or excessive mucus indicates a bacterial infection or severe tissue irritation.
- Tissue Recession: Check the base of the frag. If you see new white skeleton appearing, this is a critical warning sign that tissue is still receding.
The 48-Hour Mark and Beyond
If the coral shows good polyp extension and no tissue recession after 48 hours, you can begin moving it to its final placement. Do this gradually over several days, moving it slightly higher or into more flow each day to allow photoadaptation without shock.
Equipment Checklist for the Recovery Protocol
Have these tools on hand before the coral arrives:
- Coral Dip (CoralRx or Revive): For pest prevention.
- Airline Tubing and a Control Valve: For drip acclimation.
- A Small Plastic Container: For the dip and acclimation process.
- A Refractometer: To verify the salinity of your tank water and the shipping water.
- A Magnifying Glass or Jewelers Loupe: To inspect the coral for tiny pests and tissue damage.
By following this structured protocol, you are actively managing the coral's recovery and dramatically increasing its chances of thriving in your system.
Frequently Asked Questions
Is it legal to buy real coral online?
Yes, buying coral online is legal in the United States, but the source matters. Look for aquacultured corals from domestic facilities, as these are tank-raised and avoid the legal and environmental issues tied to wild-harvested specimens. Aquacultured coral is also hardier and adapts better to home reef tanks. Reputable sellers list their stock as aquacultured or tank-raised and ship only within the U.S. Always confirm the seller operates legally and can speak to the origin of their colonies and frags.
What should I look for when buying coral online?
Look for a clear live arrival guarantee, detailed WYSIWYG photos, and transparent shipping policies. The coral itself should show vibrant color, no tissue recession, and visible polyp extension in the photos. Choose sellers who offer aquacultured frags, as these adapt better to new tanks. Check that they use proper shipping containers with heat or cold packs depending on your local forecast. Finally, confirm their quarantine procedures and ask about their acclimation recommendations before you commit to a purchase.
How does shipping stress affect live coral health?
Shipping stress is the leading cause of coral loss after an online order. Corals are packed in water and can experience temperature swings and ammonia buildup during transit, even overnight. This stress can cause tissue recession, loss of color, or a compromised slime coat, making them vulnerable to infection. A robust shipping policy uses insulated containers and heat or cold packs to minimize temperature change. After arrival, a slow drip acclimation helps the coral recover from shipping stress and adjust to your tank's water chemistry.
What should I do immediately after receiving coral in the mail?
First, open the box in a well-lit area and inspect the bags for leaks or damage. Float the sealed bags in your tank for 15-20 minutes to equalize temperature. Then, perform a dip using an iodine-based or coral-safe solution to remove pests. Rinse the frag in fresh tank water before placing it in a low-flow area of your reef tank. Do not glue the frag into its final spot for a few days. Monitor polyp extension and color over the next 48 hours to confirm it is recovering well.
Best Equipment for Starting Saltwater Tanks
How to Test Reef Tank Water: A 2026 Guide
Related Posts

How to Choose the Right Coral Lighting

SPS vs LPS Coral Care Requirements

Design a 75 Gallon Reef Tank: Complete Setup Guide

Coral Acclimation Guide for Hobbyists: 2026 Edition

Professional Reef Tank Installation Cost: 2026 Guide

How to Prevent Fish Disease Introduction: 7 Steps

Troubleshooting Common Reef Tank Problems: 2026 Guide
