

How to Acclimate Saltwater Fish Safely: 2026 Guide
Table of Contents
- Why Proper Acclimation Matters for Saltwater Fish
- Equipment You Need Before You Start
- How Long to Acclimate Saltwater Fish: Timing Guidelines
- Drip Acclimation Saltwater Fish: Step-by-Step Method
- Floating and Plop and Drop: When Simpler Works
- Quarantine Saltwater Fish Procedure Before Introduction
- Signs of Stress in New Saltwater Fish and How to Respond
- Final Checklist for a Safe Transition
- Frequently Asked Questions
Last Updated: September 9, 2026
Why Proper Acclimation Matters for Saltwater Fish
Acclimation is the process of gradually adjusting a fish to the water chemistry of your aquarium, and it is the single most important step for ensuring a new arrival survives its first week. When a fish moves from a shipping bag into your tank, differences in salinity, pH, and temperature create osmotic shock, a physiological stress that can kill within hours (fisheries.org). More livestock is lost to rushed acclimation than to any disease.
The danger is not just the salt level. As a bag sits closed during transit, carbon dioxide builds up and drives the pH downward. When you open the bag, the pH can spike rapidly, converting harmless ammonium into toxic ammonia. This is why simply floating the bag and dumping the fish in is a gamble.
Below, we will show you exactly how to acclimate saltwater fish safely using methods that protect against osmotic shock and ammonia toxicity, covering timing, equipment, and the step-by-step drip method.
Equipment You Need Before You Start
Before the fish arrives, gather everything you need so you are not scrambling mid-process. A common mistake is starting a drip and realizing you lack a control valve.
Here is the full list:
- A clean bucket (food-grade, never used with soap or chemicals) large enough to hold the fish and its bag water
- 6 to 8 feet of airline tubing
- A plastic control valve or gang valve to adjust the drip rate
- A clip or binder to secure the tubing to the tank rim
- A net, preferably with soft mesh
- A refractometer or hydrometer to check salinity
- A thermometer to confirm temperature
You will also need a small container of tank water ready for topping off, and a flashlight to observe the fish during the process. A full line of acclimation supplies is available through Blue Earth Corals and Aquariums alongside our livestock and Red Sea aquarium systems.
How Long to Acclimate Saltwater Fish: Timing Guidelines
The ideal acclimation time for most saltwater fish is 45 to 90 minutes, depending on how different the bag water is from your tank water. The drip method should never be rushed below 30 minutes, but it also should not stretch past two hours, as the fish is confined in a small volume of water with rising ammonia.
| Situation | Recommended Time | Method |
|---|---|---|
| Bag water matches tank salinity closely | 30-45 minutes | Drip acclimation |
| Significant salinity difference (0.004+ specific gravity) | 60-90 minutes | Drip acclimation |
| Shipping time under 12 hours | 45-60 minutes | Drip acclimation |
| Shipping time over 24 hours | 60-90 minutes | Drip acclimation, monitor for ammonia |
| Hardy fish (clownfish, damsels) | 30-45 minutes | Drip or float |
| Sensitive fish (angelfish, tangs, butterflies) | 60-90 minutes | Drip only |
The exact timing should be guided by the specific gravity reading, not the clock. Measure the salinity of the bag water and your tank water first. If the difference is large, extend the drip. What matters is that the fish experiences a gradual change, not a sudden one.
Drip Acclimation Saltwater Fish: Step-by-Step Method
Drip acclimation is the gold standard because it slowly equalizes all water parameters, including salinity, pH, and dissolved gases. It is the safest way to acclimate saltwater fish, particularly for sensitive species that cannot tolerate rapid shifts.
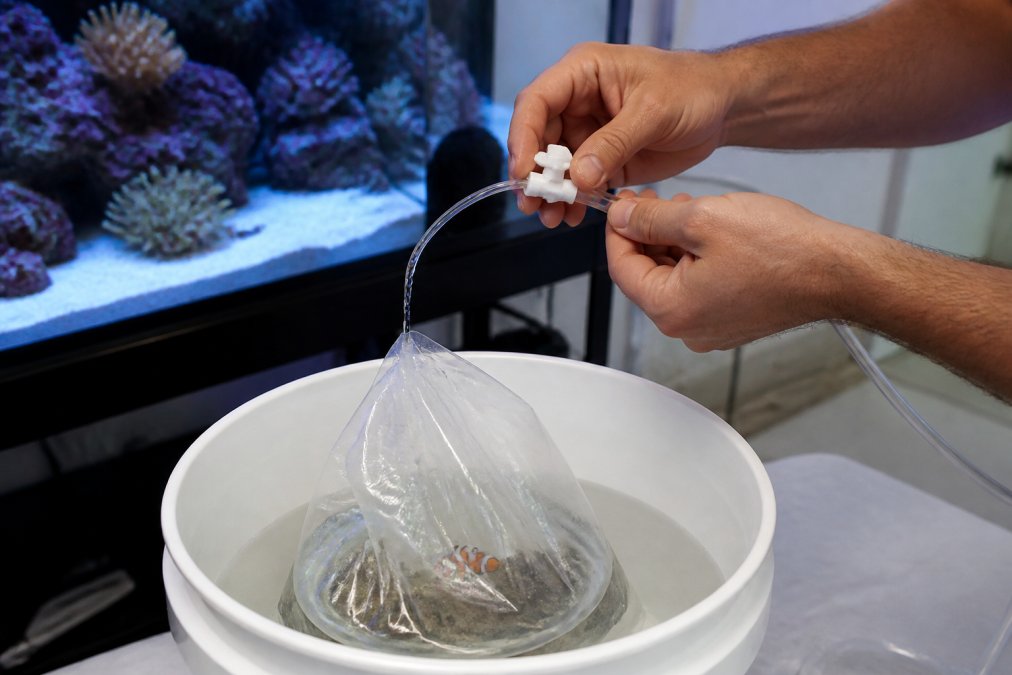
Follow these steps carefully:
- Turn off the aquarium lights. This reduces stress on the new fish and on any tank inhabitants.
- Float the sealed bag in the aquarium for 10 to 15 minutes. This equalizes temperature. Do not open the bag yet.
- Open the bag and pour the fish and water into your clean acclimation bucket. Do not add the bag water to your display tank.
- Start the siphon. Place one end of the airline tubing in the tank and the other end in the bucket. Suck gently on the tubing to start the flow, then secure it with the clip.
- Set the drip rate to 2 to 4 drops per second using the control valve. For a 75-gallon tank, this typically means the bucket volume doubles every 20 to 30 minutes.
- Monitor the process. Every 15 minutes, check the water level in the bucket and test the salinity if you have a small sample. The goal is to raise the bucket's salinity gradually to match your tank.
- Remove the fish with a net once the bucket water is within 0.001 specific gravity of your tank. Do not pour the bucket water into your aquarium.
- Gently release the fish into the tank, ideally near a rock structure where it can hide.
Floating and Plop and Drop: When Simpler Works
Most guides present the "plop and drop" method as a viable shortcut, but that advice is dangerously oversimplified. The reality is that this method is only safe under a narrow set of conditions that rarely apply to shipped fish.
The Only Scenario Where Plop and Drop Is Acceptable
Plop and drop, netting the fish directly from the bag and placing it in the tank, is defensible only when all of the following are true:
- The fish was purchased locally from a store that uses the same synthetic salt mix and source water as your tank (not just the same salinity, but the same ionic balance).
- The salinity difference between the bag water and tank water is less than 0.001 specific gravity (about 0.7 ppt).
- The pH difference is less than 0.2 units.
- The fish is a hardy species such as a clownfish (Amphiprion ocellaris), a damselfish (Chromis viridis), or a dottyback.
- The fish has been in the bag for less than 30 minutes, so ammonia buildup is negligible.
Even when these conditions are met, you are still skipping temperature equalization. A 10-minute float before netting eliminates that risk with almost no cost.
Why Floating Alone Is Not Enough
Floating the sealed bag for 15 minutes equalizes temperature, but it does nothing for salinity or pH. Worse, it leaves the fish in its own waste. During transit, fish excrete ammonia. In the closed bag, the pH drops as CO2 accumulates, keeping ammonia in its less-toxic ionized form (NH4+). The moment you open the bag, CO2 off-gasses, pH rises, and a portion of that ammonium converts to toxic free ammonia (NH3). A fish floating in an open bag is now swimming in water that is becoming more toxic by the minute.
This is why the "float and release" method is a gamble even for hardy fish. The temperature is right, but the chemistry is wrong.
Species-Specific Decision Tree
Your choice of method should be driven by the species' known sensitivity to osmotic shock. Here is a practical breakdown based on what reef keepers and aquaculture facilities observe:
| Species Category | Examples | Recommended Method | Maximum Tolerable Salinity Shift |
|---|---|---|---|
| Hardy | Ocellaris clownfish, green chromis, blue-green chromis, damsels | Float 10 min, then drip at 2-3 drops/sec for 20-30 min | 0.003 SG per 15 min |
| Moderate | Firefish (Nemateleotris magnifica), royal gramma, banggai cardinal | Full drip at 2-4 drops/sec for 45-60 min | 0.002 SG per 15 min |
| Sensitive | Angelfish (Centropyge species), tangs (Zebrasoma species), butterflyfish | Full drip at 1-2 drops/sec for 75-90 min | 0.001 SG per 20 min |
| Extremely Sensitive | Mandarins (Synchiropus splendidus), seahorses, pipefish | Full drip at 1 drop every 2 seconds for 2 hours | 0.0005 SG per 20 min |
These are not arbitrary numbers. Wrasses and angelfish have thinner gill epithelia and less robust osmoregulatory systems than damsels. A rapid salinity change of 0.003 SG can cause gill tissue damage in a sensitive wrasse that a clownfish would shrug off (peer-reviewed research).
The Local Fish Store Exception
If you buy from a local fish store that maintains its systems with the same salt brand and at the same salinity as your tank, the water chemistry gap is minimal. In that case, a 15-minute float followed by a net transfer is reasonable for hardy fish. But you should still test the bag water's salinity and pH before you commit. If the store's salinity is 1.025 and yours is 1.026, that is a 0.001 difference, fine for a float-and-release. If the store runs at 1.023 and you run at 1.026, that 0.003 gap requires a drip.
The Cost-Benefit of Skipping the Drip
The drip method costs you 45 minutes. The plop-and-drop method costs you 30 seconds. If you skip the drip and the fish survives, you have saved 44.5 minutes. If the fish dies, you have lost the purchase price, the shipping cost, and the weeks of effort spent maintaining your tank. For a $15 damsel, the risk might be acceptable. For a $150 angelfish, it is not rational. The safest rule is simple: when in doubt, drip.
Quarantine Saltwater Fish Procedure Before Introduction
Quarantine is a separate step that happens after acclimation and before the fish enters your display tank. A quarantine tank is a small, bare-bottomed aquarium with minimal décor, simple biological filtration, and no corals or invertebrates. It exists to observe the new fish for disease without risking your main system.
The quarantine saltwater fish procedure is straightforward. Set up the tank with water matching your display tank's parameters, and keep it cycled and ready. When new fish arrive, acclimate them into the quarantine tank instead of the display. Observe them for 2 to 4 weeks, watching for white spots, fin clamping, or rapid breathing. Treat any issues in the quarantine tank, where medications will not harm your biological filtration or invertebrates.
Many hobbyists skip quarantine because it requires an extra tank. That is a risk. Introducing an unquarantined fish can wipe out an entire display tank with ich or velvet. If you do not have a quarantine tank, consider using an acclimation box inside your display tank as a compromise, though this is less effective for disease prevention.
Signs of Stress in New Saltwater Fish and How to Respond
Even with perfect acclimation, a new fish will show some stress. The key is distinguishing normal adjustment from a problem that needs intervention. Signs of stress in new saltwater fish include rapid gill movement, clamped fins, hiding in corners, loss of color, and erratic swimming.
Normal stress after introduction lasts 24 to 48 hours. The fish may hide and refuse food for the first day. This is expected. However, if the fish is gasping at the surface, breathing heavily after 24 hours, or developing white spots, you need to act.
The first response is to test your water parameters immediately. Ammonia and nitrite spikes are common when a new fish is added to a tank with an immature biological filter. If ammonia is present, perform a water change and add a detoxifying agent. If the fish shows signs of ich, move it to a quarantine tank and begin treatment. Do not medicate your display tank, as copper-based treatments will kill invertebrates and corals.
Final Checklist for a Safe Transition
Before you begin, run through this checklist to ensure you have not missed a step. Each item addresses a common cause of new-fish mortality.
- Test salinity of bag water and tank water with a refractometer
- Confirm tank temperature is between 74-78°F
- Turn off aquarium lights to reduce stress
- Float sealed bag for 10-15 minutes to equalize temperature
- Set up drip acclimation with airline tubing and control valve
- Drip at 2-4 drops per second for 45-90 minutes
- Never pour shipping water into the display tank
- Net the fish out, do not pour the bucket into the tank
- Release fish near rockwork for hiding places
- Observe for signs of stress for the next 48 hours
- Do not feed for the first 24 hours
- Quarantine new arrivals for 14 days when possible
The First 24 Hours: A Post-Acclimation Monitoring Protocol
The acclimation process does not end when the fish leaves the net. The first 24 hours after introduction are when most delayed mortality occurs. Here is what a structured observation plan looks like.
Hour 0-1: Immediate Post-Release
- Dim the aquarium lights to 20-30% intensity or turn them off entirely. Bright light is a major stressor for a fish coming from a dark shipping bag.
- Watch the fish from a distance. Do not hover at the glass. A fish that sees a large predator-shaped silhouette will go into a hiding response that can last for days.
- Confirm the fish is breathing steadily. Rapid gill movement (more than 60 beats per minute) in the first 15 minutes is normal. Gasping at the surface is not.
- Check that the fish can maintain neutral buoyancy. A fish that lists to one side or sinks to the bottom is in distress.
Hour 2-4: Settling In
- The fish should be exploring its immediate surroundings or hiding in rockwork. Both are normal. A fish that is swimming frantically against the glass is showing acute stress.
- Test ammonia and nitrite in the display tank. If you see any ammonia reading above 0 ppm, perform a 10% water change immediately and add an ammonia-neutralizing product like Seachem Prime.
- Do not feed. The fish's digestive system is still adjusting, and uneaten food will only degrade water quality.
Hour 6-12: First Signs of Trouble
- Check for white spots (Ichthyophthirius multifiliis or Cryptocaryon irritans). These parasites are often present in low numbers on new fish and only become visible under stress. If you see a single white spot the size of a grain of salt, begin planning a quarantine transfer.
- Observe the fish's color. A fish that has lost its color and is pale or washed out is under significant stress. Some color loss is normal for the first few hours, but it should be returning by hour 6.
- Check that the fish is not flashing (rubbing against rocks or substrate). Flashing is a sign of external parasites or irritants.
Hour 12-24: The Overnight Test
- Before you go to bed, turn off all aquarium lights completely. A dark tank mimics the natural night cycle and gives the fish a chance to rest.
- Leave a dim night light on in the room so you can do a quick check without turning on the tank lights.
- In the morning, before you turn on the tank lights, observe the fish with a flashlight. A fish that survived the night and is breathing normally has passed the critical window.
- Test water parameters again. Ammonia and nitrite should be at 0 ppm. If either is elevated, the tank's biological filter is struggling with the new bioload.
The 48-Hour Feeding Rule
Do not feed your new fish for the first 24 hours. At the 24-hour mark, offer a small amount of food, no more than what the fish can consume in 2 minutes. Use a high-quality food like frozen mysis shrimp or a pellet designed for the species. A fish that eats within the first 48 hours has a significantly higher survival rate than one that refuses food. If the fish does not eat by hour 48, do not panic. Some sensitive species, particularly angelfish and mandarins, can go 3-5 days before accepting food in a new environment. Offer food twice daily and remove any uneaten portions after 5 minutes.
When to Intervene
| Symptom | Timeframe | Action |
|---|---|---|
| Gasping at surface | Within first 6 hours | Check ammonia, increase surface agitation, perform 10% water change |
| White spots visible | Within first 24 hours | Move to quarantine tank, begin copper treatment if confirmed |
| Refusing food | After 72 hours | Offer live foods (brine shrimp, copepods) to stimulate feeding response |
| Erratic swimming (spiraling, darting) | Within first 12 hours | Check salinity with refractometer, verify no rapid pH shift occurred |
| Clamped fins with labored breathing | After 24 hours | Test for ammonia and nitrite, check for gill damage from shipping |
Following this process will dramatically improve survival rates for new arrivals. The science behind acclimation is clear: gradual changes in water chemistry reduce osmotic shock and give the fish time to adjust its internal salt balance. But the process does not end at the net. The first 24 hours are when your preparation pays off. For guidance on specific species or to source healthy livestock, the team at Blue Earth Corals and Aquariums can help you select specimens that will thrive in your system, backed by our aquaculture facility and 19 years of experience.
Frequently Asked Questions
Is 30 minutes enough time to acclimate saltwater fish?
For most hardy fish, 30 minutes is the absolute minimum, but it is rarely enough to safely balance water chemistry. A safer target is 45 to 60 minutes for fish that arrive with water parameters close to your tank's. When the salinity or pH differs significantly, you should extend the drip acclimation to 90 minutes or more. Slowly matching specific gravity reduces osmotic shock, which is a leading cause of death in newly introduced fish. When in doubt, slower is always safer.
Should I open the bag when acclimating saltwater fish?
Yes, you should open the bag, but do it carefully. After floating the sealed bag for 15 minutes to equalize temperature, open the top and roll the edges down so it stays open. This exposes the water to air and allows gas exchange. However, do not let the fish jump out. You should also avoid pouring the bag water into your display tank. Use a net to transfer the fish, as the bag water often contains high ammonia levels from the shipping process.
What is the drip acclimation method for saltwater fish?
Drip acclimation slowly introduces your tank's water into the container holding the new fish. You use airline tubing with a control valve to create a steady drip, typically 2 to 4 drops per second. This gradual process allows the fish to adjust to differences in salinity and pH over an hour or more. It is the preferred method for sensitive species and is essential for invertebrates like corals and shrimp, which cannot tolerate rapid changes in water chemistry.
How can I tell if my new fish are acclimating well?
A fish acclimating well will maintain normal breathing, hold its fins erect, and swim steadily in the container. Mild color loss is common, but severe fading or darkening indicates stress. Watch for clamped fins, rapid gill movement, or listing to one side. These signs of stress in new saltwater fish mean you should slow the drip rate. After release, a healthy fish will explore its new environment within minutes and begin breathing normally, not gasping at the surface.
Reef Tank Design Services: Custom Builds in Florida
Professional Aquarium Cleaning Services West Palm
Related Posts

How to Choose the Right Coral Lighting

SPS vs LPS Coral Care Requirements

Design a 75 Gallon Reef Tank: Complete Setup Guide

Coral Acclimation Guide for Hobbyists: 2026 Edition

Professional Reef Tank Installation Cost: 2026 Guide

How to Prevent Fish Disease Introduction: 7 Steps

Troubleshooting Common Reef Tank Problems: 2026 Guide
